• stem+node ceramics
  • HOME
  • Food Recipes
  • About
  • Contact
Menu

The Lovely Crazy

Street Address
City, State, Zip
Phone Number

Your Custom Text Here

The Lovely Crazy

  • stem+node ceramics
  • HOME
  • Food Recipes
  • About
  • Contact

Roasted Maple Cumin Cauliflower with Tahini

February 16, 2019 Colleen Stem
IMG_5476 2.jpg

Nothing here but a mere craving, the fact that I had a fresh head of cauliflower, and I really wanted tahini. TA DA. I made exactly what I wanted and it was so so sooooo good. Maple Cumin is one of those super A+++ taste pairings and anything roasted cover in tahini is basically going to be a win so I had no fear when making this dish that it was going to be anything but fanatic.

And of course I was right. It was so freaking good, like now I am going to make it again and again because I don’t want make cauliflower any other way ever or at least until I get sick of it or of roasted vegetables. But that probably won’t happen for a while.

So if you like cauliflower and tahini and amazingness, here, make this.

To the cauliflower

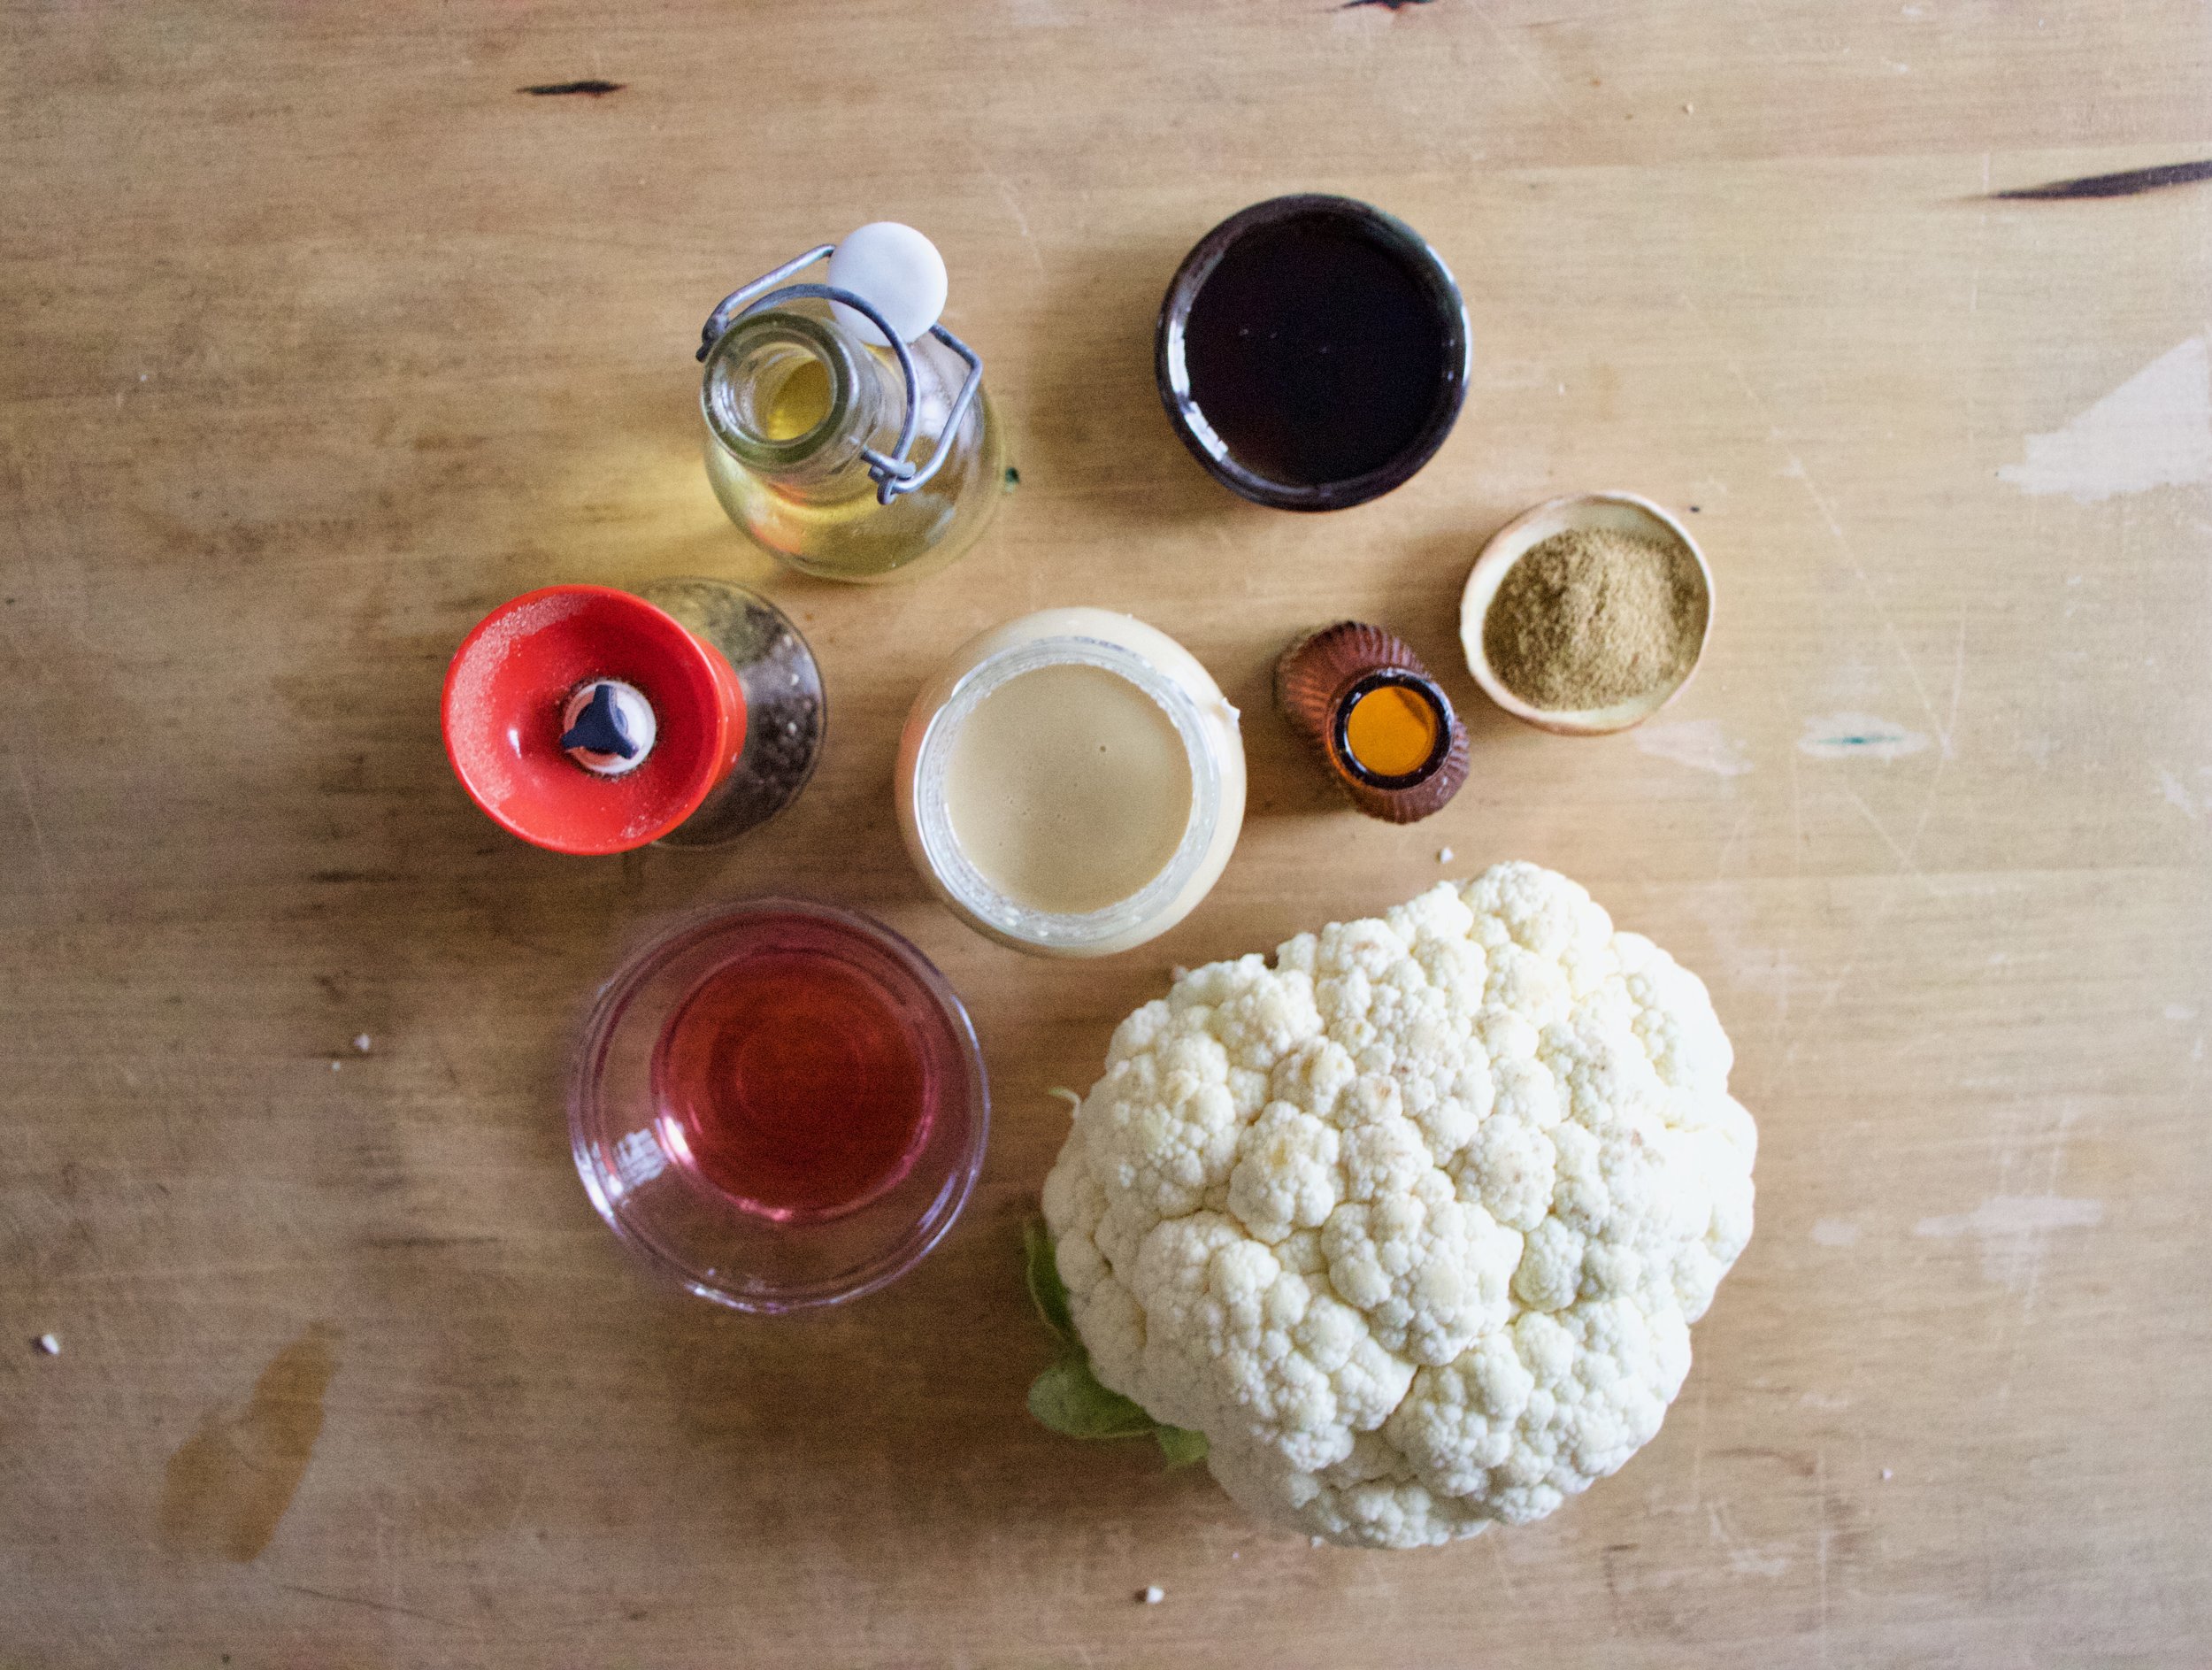
The stuff. A head of cauliflower, tahini, maple syrup, cumin powder, red wine vinegar, salt and pepper, and olive oil.

IMG_5385.jpg
IMG_5396.jpg

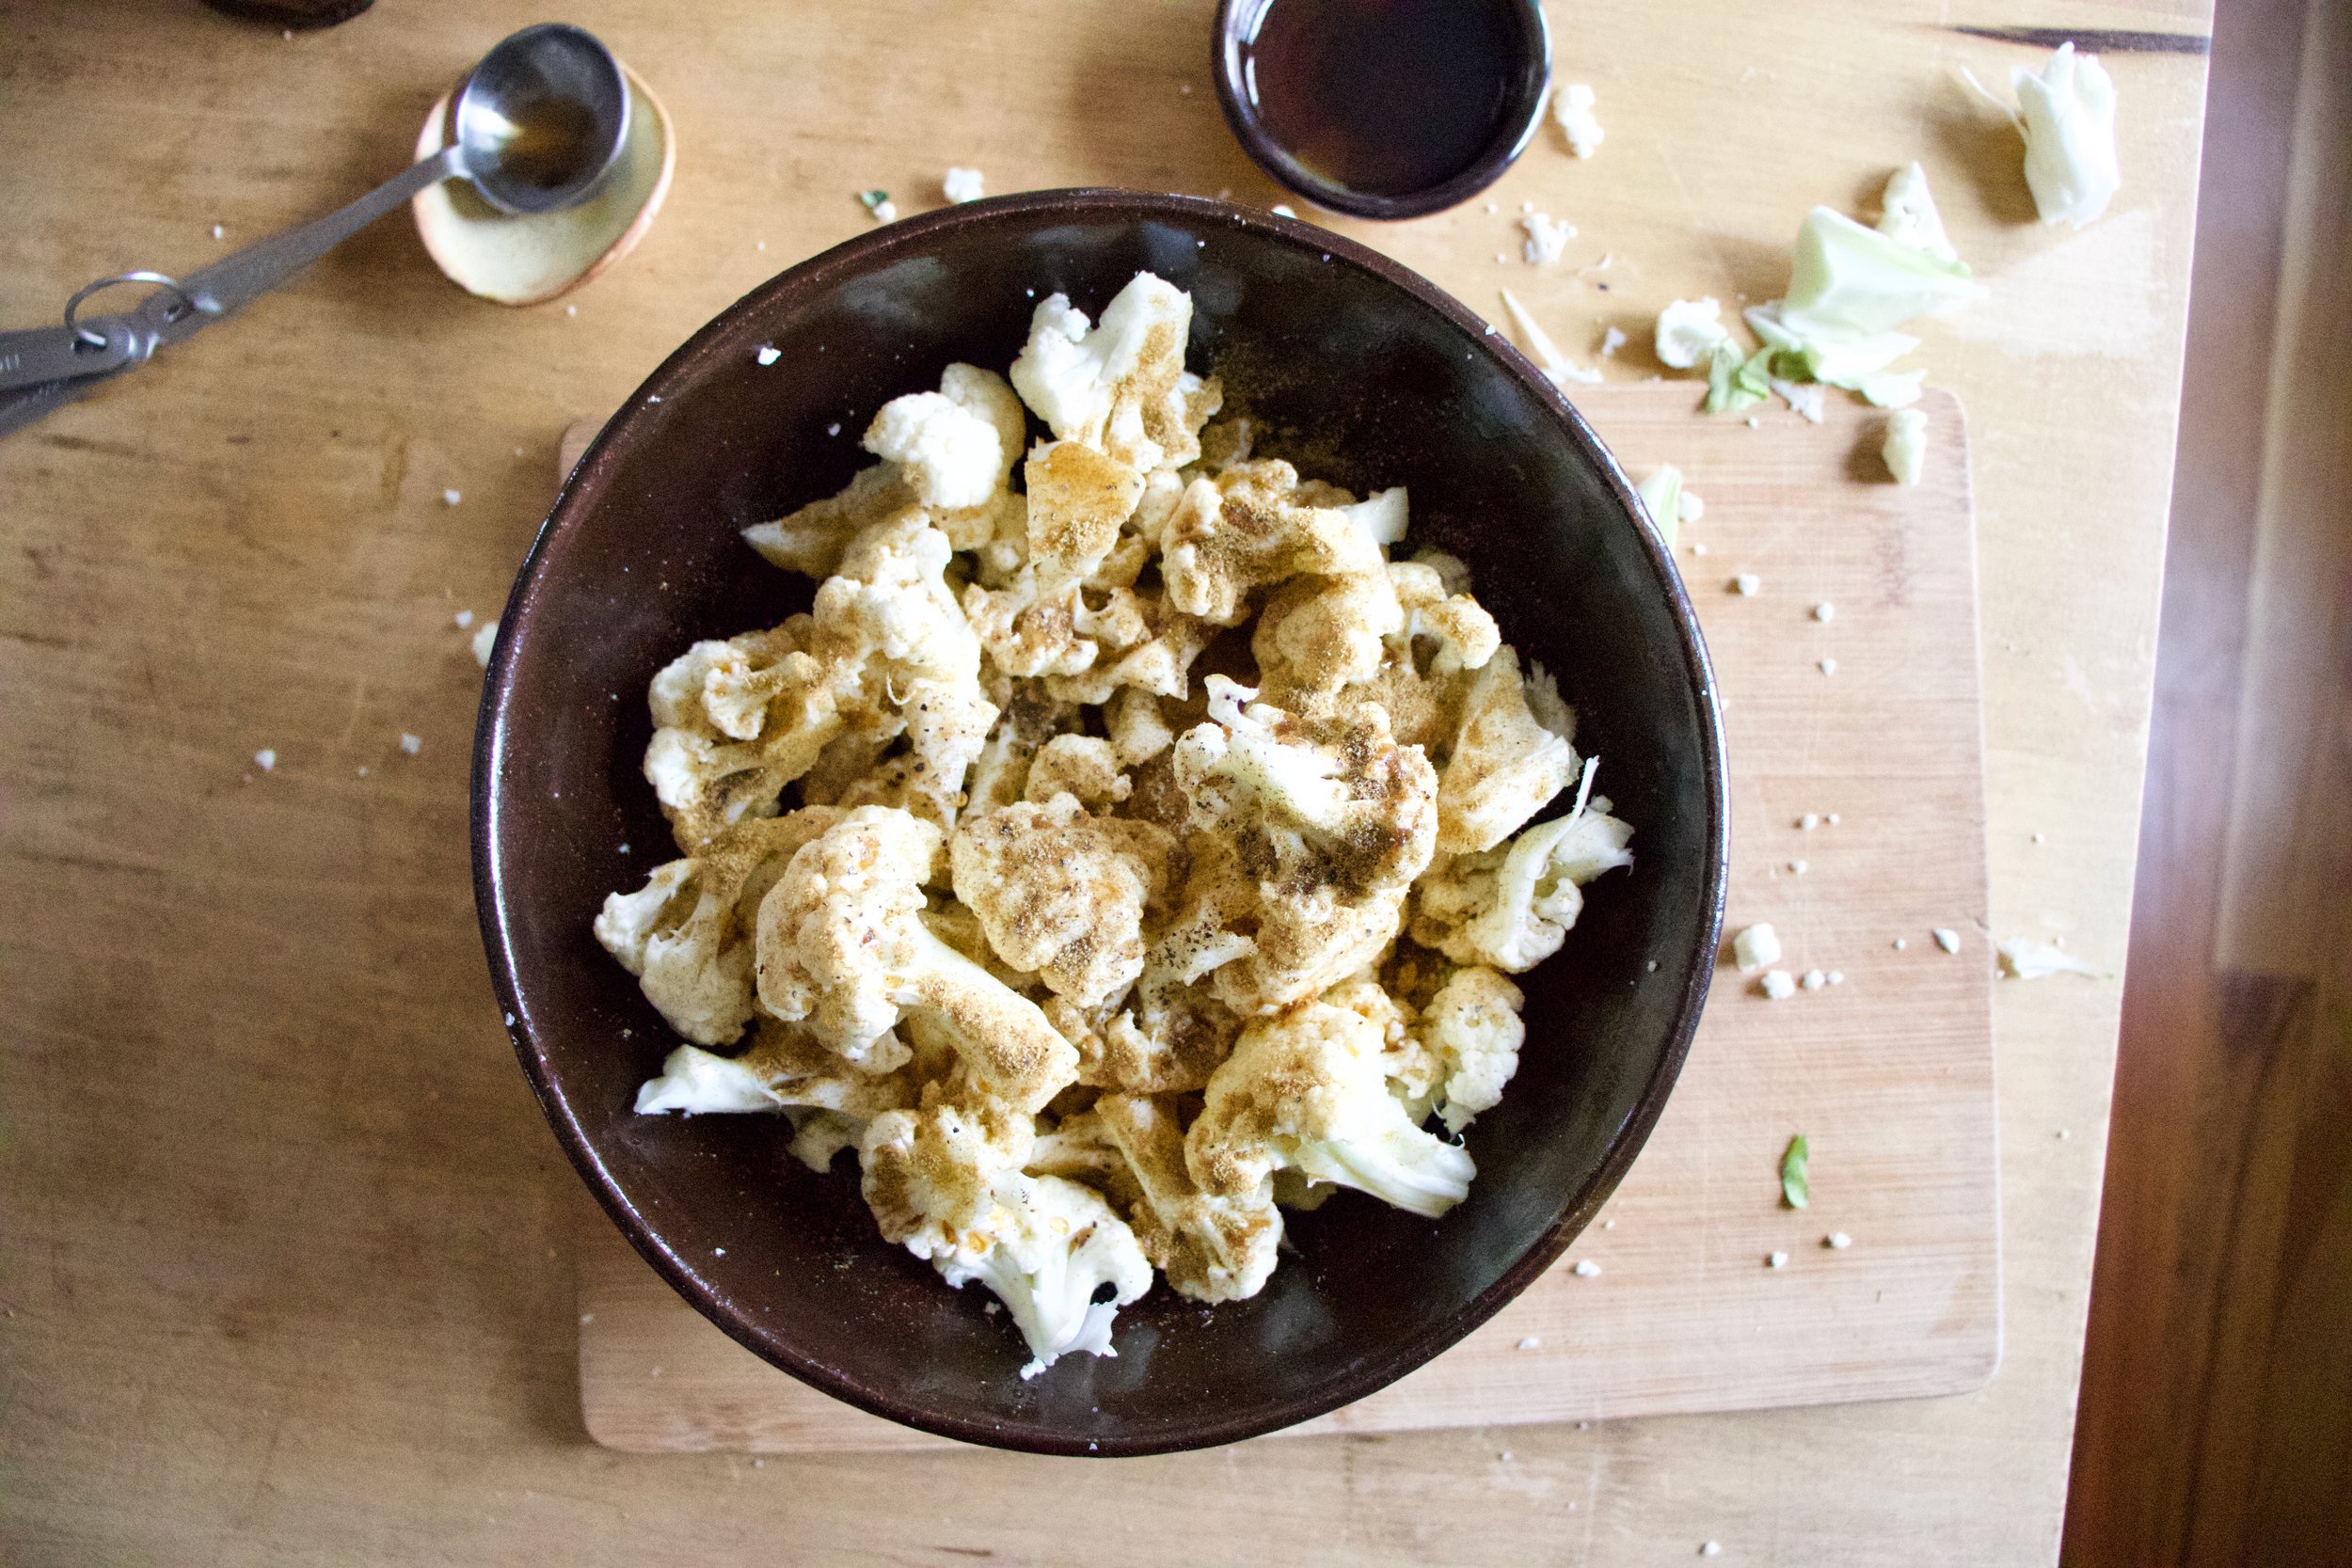
Break or cu the head of cauliflower up into florets and toss with a little oil, the maple and cumin, and a little salt and pepper.

IMG_5397.jpg

Scatter on a baking sheet and stuff it into a hot oven.

IMG_5425.jpg

Meanwhile mix tahini with vinegar, salt and pepper, and enough warm water to thin out.

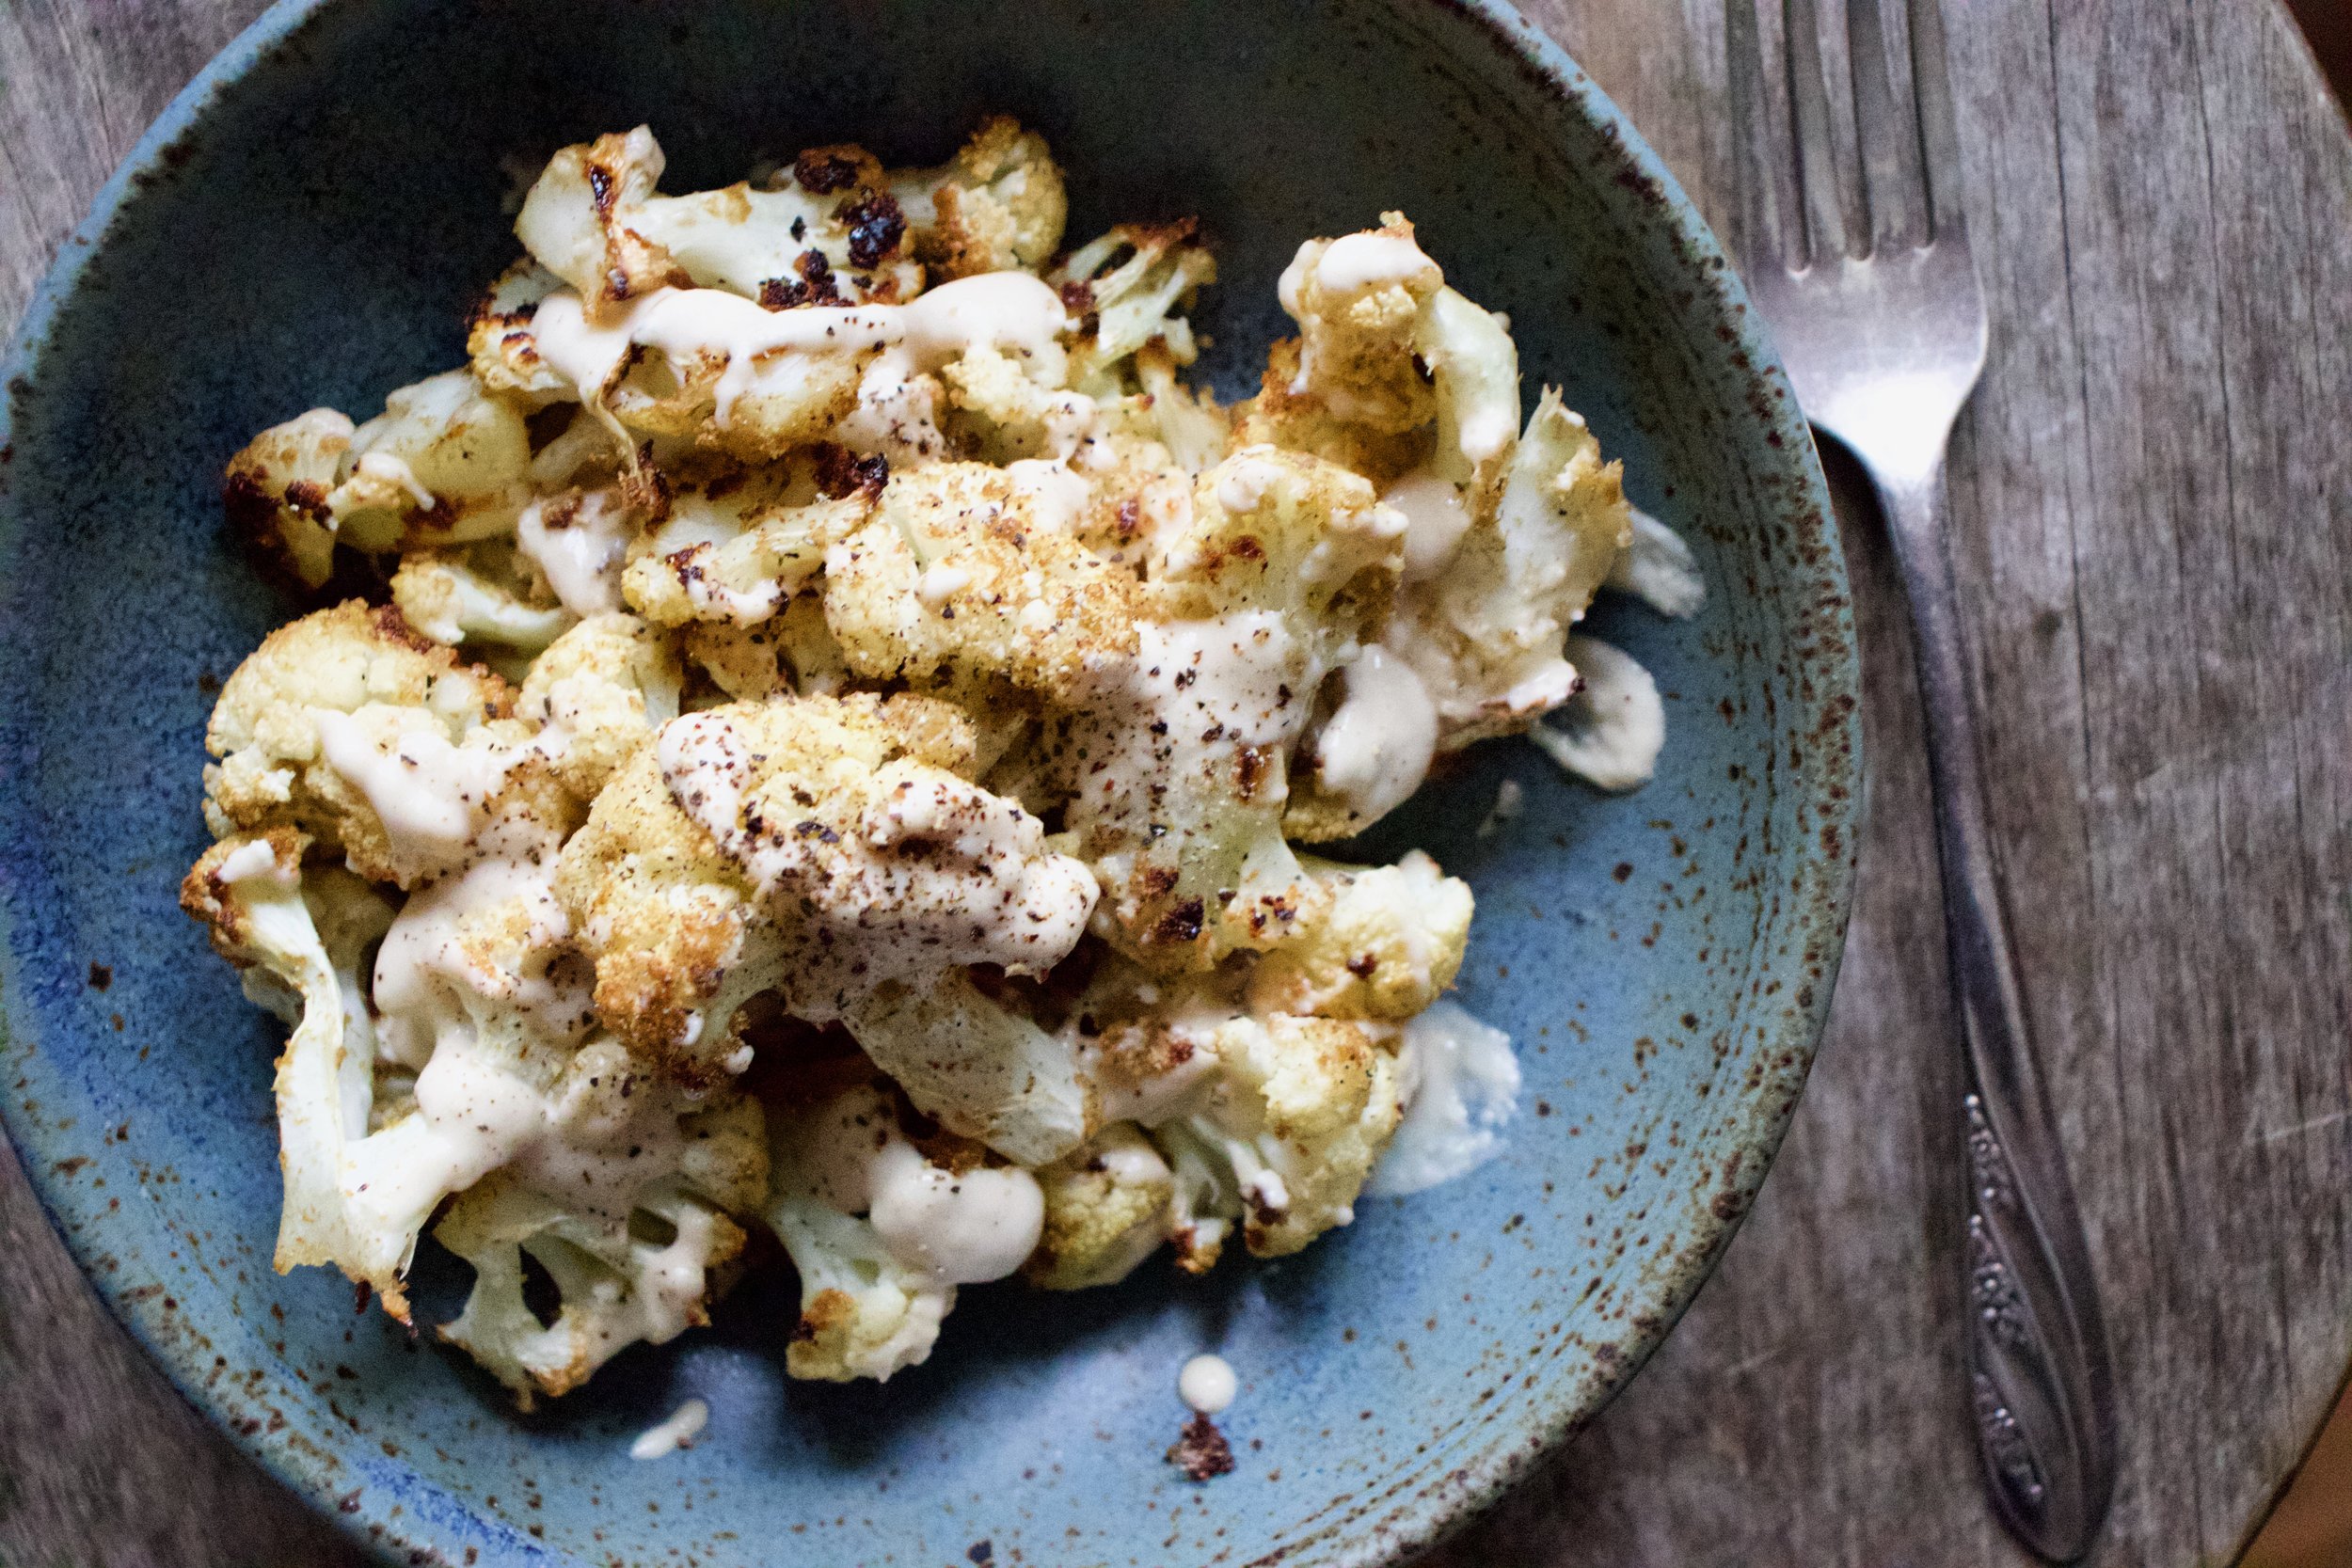
Roasted all nice and crisp and delightful.

And now you gather up all that cauliflower and cover with all the tahini you want. Grab a bowl, or just eat off baking sheet, and get to it.

And there is no shame in eating a whole head of cauliflower because hey, its cauliflower.

-C


Roasted Maple Cumin Cauliflower with Tahini

Makes a meal for one or a side for a few

  • a head of cauliflower

  • 3 teaspoons cumin

  • 2 tablespoons maple syrup

  • olive oil

  • 3 tablespoons tahini

  • 2 tablespoons red wine vinegar

  • 2-3 tablespoons warm water

  • salt and pepper

Preheat oven to 450

Break or cut the cauliflower into medium sized florets. Place in a bowl and drizzle with a teaspoon or so olive oil and toss around. Drizzle in maple, add in the cumin, and a pinch of salt and pepper. Toss until coated then dump the cauliflower onto a baking sheet. Place in hot oven for 25-30 minutes or until roasted to your liking.

While that’s roasting, mix up the tahini, vinegar, and a pinch of salt and pepper. Add in warm water until the mixture is a drizzlable consistency.

Once cauliflower is out of oven, cover with tahini.

Now eat.

There will be no left overs so don’t worry about it.

In dinner, Gluten Free, grain free, quick and easy, side dish, Vegan, Vegetables, snack Tags Roasted Maple Cumin Cauliflower with Tahini, vegan, cauliflower, plant based, maple cumin, tahini, roasted, vegetables, side dish, main dish, gluten free, grain free, dairy free, whole food, simple, easy
Comment

Parsnip Fritters

February 2, 2019 Colleen Stem
IMG_5053.jpg
IMG_5061.jpg
IMG_4970.jpg

Fritters are no joke. You can just about turn anything into a fritter and almost all of the time it will taste pretty good. Parsnips are no exception. Tasting the way parsnips do, straight up without any extra spices, these fritters will hit the spot if you are on the lookout for a fritter for your fritter seeking self.

And what if you are not sure you like parsnips or fritters for that matter. Stop right here. You probably do and just don’t know it yet. I guess the only way you will really know is to make a batch. Then you can tell me all about how you love parsnips and will now be making fritters for every meal every day for the next week.

To the frittering.

IMG_4902.jpg

The stuff. Parsnips (I only needed one because mine are humongous) a carrot, an onion,. some garlic powder. a little oat flour, a flax egg, and some olive oil. Also if you want to serve with avocado mash (which tastes great together), well grab one and a lemon too.

Start being shredding the parsnip, carrot, and half the onion into a big bow. Chop up the other half of onion into small bits. I do this because grating onion only turns the onion into a juice and I like the little bits if onion in my fritter.

Shredded and mixed. And pretty too.

IMG_4926.jpg

Add in the garlic powder, a little salt and pepper, the flax egg, and the oat flour.

Mixed and ready for the cooking.

IMG_4950.jpg

A medium hot frying pan with a little olive oil is what you need. Make medium sized flattish patties and cook until nice and golden brown.

IMG_4959.jpg

Flip and cook the other side just the same.

IMG_4966.jpg

Fritters are done and could be eaten now too, but I like to stick them on a baking sheet and into the oven for 10 minutes or so to really crisp them up.

If you want to serve with avocado, just mash half of one up with a pinch of salt and juice of lemon.

IMG_5027.jpg

And that is that. Out of the oven, onto a plate, and into the mouth.

Enjoy

-C


Parsnip Fritters

makes about 9 fritters

  • 1-3 parsnips, depending on size (about 2 1/2 cups shredded)

  • 1 carrot

  • a medium sized onion

  • 1/3 cup oat flour

  • 1 flax egg (3 tablespoons warm water and 1 tablespoon ground flax seed)

  • 1 teaspoon graduated or powdered garlic

  • salt and pepper

  • oil (any kind you like)

  • An avocado and a lemon (optional)

Preheat oven to 400

Shred the parsnips, carrot and half the onion into a large bowl. Mince the second half of onion and mix into the shredded. Add a pinch of salt and pepper, the flax egg, and the oat flour and mix until evenly incorporated. Grab a flying pan, add a little olive oil, and place on medium high heat. Once pan is hot, scoop about 1/4 cup of the mixture into pan, trying o keep it compacted. Let it cook for a few minutes then with a spatulaf gently tamp it down. Flip and let the other side cook until golden brown. Once they are cooked, they can be eaten, but I like to place them into the oven for about 10 minutes to cook and crisp up a little more.

Once done, serve anyway you like, but mashed up avocado with lemon is fantastic. Tahini would also rock.

Eat and if you by chance have any left over (but you wont) they can be placed in fridge and reheated later (or eaten cold)

In Vegetables, Vegan, quick and easy, grain free, Gluten Free Tags Parsnips, Parsnip Fritters, Fritters, Pancakes, latkes, vegan, egg free, gluten free, plant based, flax egg, dinner, quick and easy, root vegetables, grain free, dairy free
Comment

Quick Pickled Green Beans

December 29, 2018 Colleen Stem

Any time is a good time for pickles, but now is a great time. There has been so much baking, heavy, rich, and time consuming foods in the past month that I think everyone could use themselves a good helping of veggies and maybe a little brightness, like a good pickled green bean. Freshy, crisp, and clean. A jar of happy green goodness. (Don’t you describe jars of pickles just like that, a happy green jar of goodness?)

Around there parts, it’s kind of a holiday tradition with the mr to get a jar or two of pickled beans. I don’t know exactly how it started, but they are something that he has been getting every year. So this year instead of buying him a jar, I just made them. And let me tell you, it is a heck of a lot cheaper to make your own then it is to buy them, plus I think mine taste better if I do say so myself. These pickles are of the refrigerator kind so there is no processing or stress of bad seals. Nope, these pickles take all of 15 minutes to make, a day to pickle up nice and good in the fridge, and that is that. Ready to go, ready to eat. A small task, nothing fancy, nothing a small child could not handle (um.. well I would not let a small child near boiling water so nix that but a medium to large child, yeah sure.)

Pickled green beans. You know you want them so go and make them.

To the pickled beans!

The stuff. Fresh green beans, white vinegar, salt, peppercorns, garlic, dill and a dried cayenne pepper. The dill and cayenne pepper are optional and you can use any spices you want, but these are good ones to try.… Next batch I am going to do fresh turmeric and ginger, see how that comes out.

IMG_3814.jpg
IMG_3816.jpg

The hardest and not hard at all part. Blanch the beans. Basically just toss the beans into a boiling pot of water for 2ish minutes then scoop them out into a bowl of ice water. Easy peasy.

Jar preparation. I figured I would do two flavors, a spicy cayenne and a dill. (Cayenne for me, dill for the mr) Both jars get a chunked up glove of garlic and some slightly smashed up peppercorns. The hot pepper goes into one and the dill into the other.

IMG_3840.jpg

Then make the brine. Just boil the vinegar with salt. Nothing fancy.

IMG_3834.jpg

You got the jars ready and the brine made so now you just pack the two jars with the blanched beans. You might need to snip a few in order to fit, but I just eat those ends anyway so I am doing myself favor here.

IMG_3848.jpg

Then you pour equal amounts of the brine into the jars then top off the the jars with ice water. Place a lid on those suckers and give them a good shake and into the fridge they go. 24 hours give or take and that is that.

And now you got pickled green beans. The question is weather you eat a few at a time or if one jar constitutes a vegetable serving and you eat the whole jar at once.

I say eat the whole jar. Not like it took very long to make right? So maybe you just a few extra jars.

Have a lovely weekend.

-C


Quick Pickled Green Beans

maks 2 pint jars

  • 1 pound green beans

  • 2 cups water vinegar

  • 1 1/2 - 2 cups cold water

  • 2 teaspoons salt

  • 1 teaspoon whole or slightly crushed peppercorn

  • 2 big cloves garlic

  • A tablespoon dried dill and a dried cayenne pepper (optional)

Rinse green beans. Bring a large pot of water to a boil and grab a large bowl and fill with cold water and a few ice cubs. Place half the green beans in the boil water and let cook for about 2 minutes. Scoop them out and place into the bowl of ice water. Repeat for the second half of beans.

Place the vinegar and salt in a small pot (or use the pot you used to boil water) and bring to a boil. Set aside

Grab 2 pint jars making sure the are nice and clean. Peel and cut the garlic into a few pieces and place into the bottoms of the jars. Add the dill to one and cayenne to the other (or whatever spices you do or don’t want to use) Give each jar some of the peppercorns then start packing the balanced beans into the jars. Try to make them all straight so you can fit in as may as you can, and if the bean is to long, just cut to fit (eat the ends) Once both jars are packed pour equal amounts of the vinegar brine to the jars. Top off each jar with cold ice water. Place a lid on the jars, give it a good shake and place jars into the fridge for 24 hours. After the wait, pop the lid and eat.

Pickled beans will last about a month in the fridge but really, if you have them for more then a week, that is just a shock.

Note about lids. I use plastic lids when dealing with anything acidic. The metal lids will work but will rust after a while and sometimes leaves metallic taste. If you only have metal lids, use a piece of wax paper in between the kid and jar.

In beans, quick and easy, snack, Vegan, Vegetables, Pickled Tags Quick Pickled Green Beans, Green beans, Quick Pickles, Pickles, Vegan, plant based, vegetable, beans, pickling, canning, refrigerator pickles
Comment

Cumin Roasted Pumpkin and Swiss Chard with Red Lentils

September 29, 2018 Colleen Stem
IMG_0915.jpg
IMG_0876 2.jpg

Are you as excited about pumpkin season as I am. And not because of pumpkin spice this or that, I am talking about real squash pumpkin. I am so excited, and have started a stash. I have about 10 sugar pumpkins all through the house. Equal parts fall decor and dinner. Being able to eat your decorations is key to a successful life. I am 100 percent sure about that.

So now that we have established that it’s time to eat pumpkin, we also have to realized that there are more ways to eat pumpkin then in baked goods. Savory pumpkin is just as good, if not better then sweet pumpkin. I mean, it’s a squash and don’t we all love a good ssavory squash situation? If you don’t, well you are in the wrong place my friend.

This dish here pretty much sums up all that I ever want to eat again. Roasted pumpkin with cumin is one of the best things ever. No joke. Swiss chard is definitely my favorite green, besides spinach, (and I love kale, but chard is better then kale too!) and red lentils are my favorite kind of lentils. All I all, this small list of ingredients makes for one heck of a dish. I was pre making this for dinner for Barb and the mr. and ended up making something else for dinner so I could eat and save it all for myself. I did not share one bit of this and feel zero bad about it. I mean, I made it so it is mine. They had chili, I secretly ate this.

It’s come to that. I am hiding my pumpkin and lentil dish. What is wrong with me? Ha!

Now to the best pumpkin dish ever!

IMG_0772.jpg

The stuff. A sugar pumpkin, some swiss chard, an onion, red lentils, a few cloves of garlic. cumin, salt and pepper, and olive oil.

IMG_0775 2.jpg
IMG_0781 2.jpg
IMG_0785.jpg

Cut the pumpkin in half, scoop the seeds out (save for roasting later), and chop into mouth sized chunks. Dice the onion up, and remove the stalk and thicker part of the rib from the chard leaves and dice up the stalk. Stick the leaves to the side.

IMG_0790.jpg

Place all the chopped up stuff onto a baking sheet, drizzle with a little bit of oil, dump on some cumin and sprinkle with salt and pepper then toss it all around.

IMG_0798.jpg

A fall roast ready for the oven.

IMG_0802.jpg
IMG_0825.jpg

Once veggies are in oven roasting, make the lentils. Water and lentil in a pot, bring to a boil, turn on low and let cook until lentils are done. Once cooked, sprinkle in a pinch of salt.

Also mince up the garlic and rough chop up the chard leaves.

IMG_0826.jpg
IMG_0834.jpg

Fall veggies are looking nice and roasted and tasting all so good. Toss in the minced garlic and chopped chard leaves and pop the baking sheet back into the oven for a little longer just until the garlic and leaves are cooked too.

IMG_0853.jpg

Look at that. So good.

Now you have your lentils and the cumin roasted pan of goodness. If you have a lime, cut that up too because it will make this all just perfect. Perfect I tell you.

Here it is. A bowl of red lentils, piled high with cumin roasted pumpkin and chard with a fresh squeeze of lime. Once you aat a few bites, tell me. Best fall dish ever, right!?!

Have a fantastic fall weekend.

-C


Cumin Roasted Pumpkin and Swiss chard with Red Lentils

serve 2-3

  • 1 pie pumpkin

  • 1 bunch of Swiss chard (between 5-6 large stalks, more if the stalks are small)

  • 1 yellow onion

  • 2-3 cloves garlic

  • 1 cup died red lentils

  • 3 cups water

  • 2 tablespoons cumin

  • A lime (optional)

  • salt and pepper

  • olive oil

Preheat oven to 400

Start by cutting pumpkin in half and removing seeds, (place seeds aside for later to roast), then cut the pumpkin into inch or so cubes. Grab the chard, remove the stalks and ribs from the leaves, place leaves to the side, and dice the stalks up. Dice onion into medium sized chunks and place all of what you have just chopped on a baking sheet. Drizzle a teaspoon or two of oil all over. Spinkle on the cumin and a pinch of salt and pepper and toss around. Evenly distribute the veggies on the pan and stick into the oven to roast, for about 25 minutes, or until the pumpkin and chard stalks are fork tender. In the meantime rough chop the leaves and mince the garlic. When the pumpkin and chard are just about done, remove pan from oven and toss in the garlic and leaves. Place pan back into oven for another 8-10 minutes or until the leaves have cooked. Remove from oven.

While the veggies are roasting, make the lentils. Place the water and lentils into a medium sized pot and bring to a boil. Once boiling, turn down to low, giving it a stir ever few minutes until lentils are soft.Once cooked, remove from heat and season with pinch of salt salt.

When the lentils are cooked and the veggies are roasted, it’s time to eat. Spoon lentils into a bowl and top with roasted veggies. Season with more salt and pepper if needed and cut up lime (optional) and squeeze juice all over. Eat right away and save any for later.

In dinner, entree, fall, Gluten Free, grain free, pulses, quick and easy, Vegan, Vegetables Tags Cumin Roasted Pumpkin and Swiss chard with Red Len, cumin, Cumin, vegan, vegan dinner, lentils, pulses, grain free, gluten free, plant based, clean eating, pumpkin, savory pumpkin, fall, fall dinner ideas, easy, protein
Comment

Creamy Tomato White Bean Soup

September 1, 2018 Colleen Stem
IMG_2096.jpg
IMG_2074.jpg
IMG_2111.jpg

This summer has been weird. And when I say weird, I mean too stupid freaking hot and humid and it's screwing up my life. I think I have gone a month, maybe more, without making soup. That is just not right. For as long as I can remember I have made soup, or at least eaten soup, just about everyday, even all summer long. But the terrible heat and humidity this year, I just have had no desire. It has been straight up shredded zucchini and whole tomatoes for some time now. I just don't want to have any residual added heat to my life.  But the other day, oh how lovely. I woke up with a chill,  enough that I needed to grab a long sleeve before leaving the house, and had the very strong urge to return home and get my soup on. And soup on I did!

For my first trip back into soup (oh how I missed soup!), I went simple and used what I, and many, many people have ample supplies of right now. Tomatoes. And beans because I wanted my soup to be thick and creamy and I had the beans so why the heck not.

This soup really requires very little and you get the most thick, delicious, creamy, tomatoey soup. Perfect to eat alone, but is fanatic with some crackers, or a hunk of crusty bread. And it uses a lot of tomatoes which is nice because I am (as are many of you.. My neighbor is bringing me HER tomatoes now too) trying to make a dent in the ever growing pile or these beauties on the counter. This soup dented it, until I went out to the garden a few minutes later. My pile is bigger then ever, which is fine because I am back on my soup game. 

IMG_1897.jpg

The stuff. Lots of tomatoes, some white beans (I used navy, but any white bean would be good) a large onion, a carrot, salt and pepper, a lemon, some olive oil, and honey (optional).

First off, chop the carrot and onion into chunks.

IMG_1932.jpg
IMG_1953.jpg

Toss the chopped stuff into a big ol' pot with a drizzle of olive oil and cook on a medium heat until nice and soft. 

IMG_1941 2.jpg

While veggies are cooking, core and cut up all those tomatoes. 

IMG_1989.jpg

When the veggies have cooked up a bit, add the tomatoes, the beans, and a sprinkle of salt and pepper to the pot and give it a good mix. Return to high heat, stirring even so often, until the tomatoes give off enough juiced to start boiling then turn heat down to medium and cook for a little while, like 1/2 an hour or 45 minutes.


IMG_2017.jpg

Until it looks lit this. The tomatoes have all fallen apart and the beans, carrots and onions are mushy. 

Blended with the juice of the lemon and a sprinkle of pepper and more salt if needed. 

IMG_2137.jpg

Now serve into a  bowls. Garnish with a drizzle of honey if you are feeling it. Sliced cherry tomatoes make for fancy garnish. 

IMG_2073.jpg

Creamy tomato bean soup for everyone!

Hurray for soup!

-C


Creamy Tomato White Bean Soup

Makes about 1/2 gallon (enough to serve a crowed or enough to serve one for a few days and maybe freeze some for later)

  • 10-12 large tomatoes 
  • 2 1/2 cup or 1 can of cooked white beans (I used navy but any white bean will be good)
  • 1 large onion
  • 1 large carrot
  • I lemon
  • olive oil
  • salt and pepper
  • honey (optional)

Start by chopping the onion and carrot up into small chunks. Grab a large heavy bottom pot, drizzle a teaspoon or two of olive on the bottom then toss in the chopped veggies. Place the pot on a medium heat, stirring occasionally until the onion and carrot start to soften. 

While the veggies are cooking, core and cut up all the tomatoes. Once the veggies are soft, dump in all the tomatoes, along with the beans and all the liquid they are in. Sprinkle with salt and pepper and turn heat up to high, giving it a good stir until the tomatoes start to get super juicy then bring the pot to a boil. Once boiling, reduce heat to medium and cook for another half hour to 45 minutes, giving it a stir ever so often.  When the tomatoes have completely fallen apart and the carrot, onions, and beans are mushy, you know its done. 

Remove the pot from heat and dd in the juice of the lemon. Using a hand blender, blend until it's a smooth creamy consistency. If you only have a counter belnder, let soup cool a little before handling and  be really freaking careful and blend a few cups at a time, making sure to have the blender lid on. Hot soup in the face is no fun.

Once soup is creamy and smooth, serve in bowls with a drizzle of honey (totally optional, but some people really like a touch of sweetness to their tomato soup) and more pepper to a taste. Garnish with thinly sliced cherry tomatoes if you are feeling fancy. 

Any extra soup can be refrigerated for up to a week. Can also be frozen. 

In Vegetables, Vegan, summer, soup, quick and easy, pulses, Dairy Free, beans Tags Creamy Tomato White Bean Soup, Tomato Soup, Soup, Beans, pulses, vegan, fall, tomatoes, fresh, simple, easy, few ingredients, creamy, gluten free, whole foods, plant based, garden food, dairy free
Comment
← Newer Posts Older Posts →
 

https://thelovelycrazy.squarespace.com/config#/|/about/

Me. Food Maker.Food eater. Woo HOO!

STEM+NODE  SMALL BATCH AND ONE OF A KIND POTTERY

stem+node ceramics


____________________

Subscribe

GET NEW POSTS IN YO EMAIL

You are AWESOME!!!


@thelovelycrazy 2014-2021